
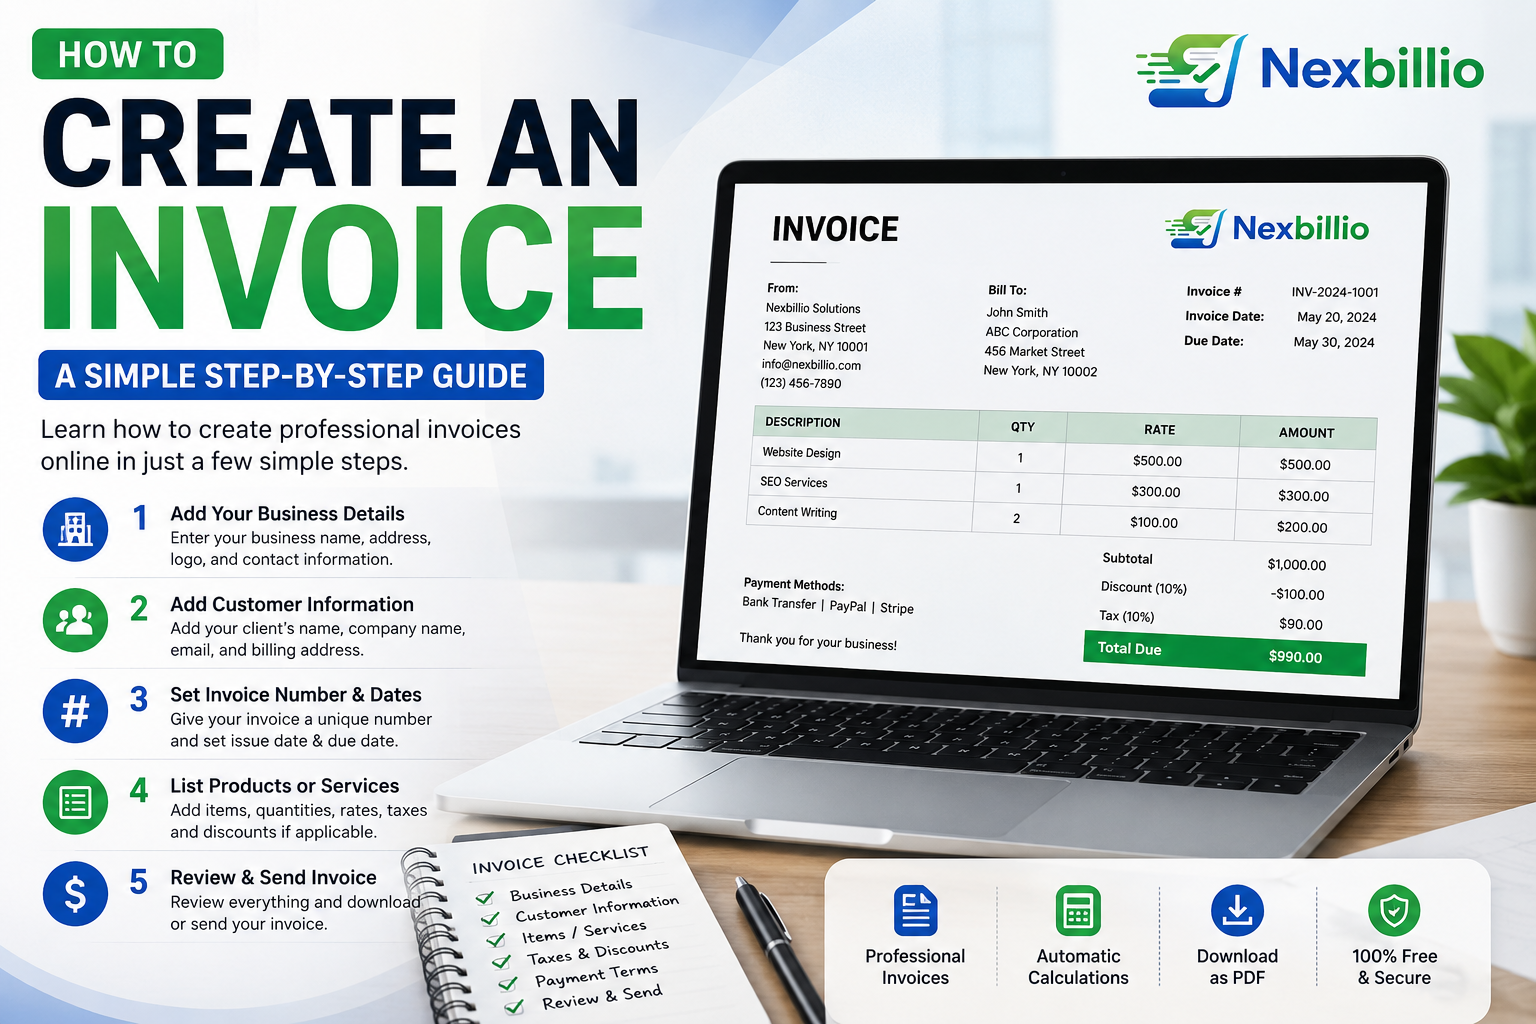
Creating an invoice does not have to be complicated. Whether you are a freelancer, contractor, consultant, online seller, photographer, designer, or small business owner, an invoice gives your customer a clear explanation of what they are paying for, how much they owe, and when the payment is due.
A good invoice is more than a simple payment request. It gives your customer the information they need to review the charges, understand the total, and complete the payment without having to come back to you for missing details. A clear invoice can also make your business look more organized and professional.
Many people still create invoices using spreadsheets or by editing an old document every time they receive a new order or complete a project. While that approach may work for occasional billing, it can become frustrating as your workload increases. A wrong total, duplicate invoice number, missing tax, or unclear payment instruction can easily lead to unnecessary emails and payment delays.
A simpler option is to create an invoice online using an invoice generator or invoice creator. Instead of designing the document from scratch, you enter your business and customer information, add the products or services, review the calculations, and generate a finished invoice that is ready to send.
What Is an Invoice?
An invoice is a document that a business or professional sends to a customer to request payment for products or services that have been provided or agreed upon.
A typical invoice contains the seller’s information, the customer’s details, a list of products or services, prices, applicable taxes or discounts, the total amount due, and payment terms. The exact format can vary depending on the business, industry, and location, but the main purpose remains the same: to make the transaction easy to understand.
For example, a web designer may create an invoice for a website project, while a contractor may use one to bill for completed work and materials. A consultant might charge by the hour or by project, while an online seller may list individual products, quantities, and prices. Regardless of the business type, the customer should be able to look at the invoice and quickly understand what the charge represents.
How to Create an Invoice Online
Creating an invoice online is usually much easier than starting with a blank document. An online invoice creator gives you a structured format, while you simply provide the information needed for the transaction.
The process is straightforward, but each section matters. Taking a little time to enter accurate information at the beginning can prevent problems later.
1. Add Your Business Information
Start by adding the information that identifies your business. This normally includes your business name, contact information, address, and any relevant tax or registration details. You can also add your company logo to make the invoice consistent with your brand.
Your business information should remain consistent across your invoices. When a customer opens the document, they should immediately know who sent it and how to contact you if they have a question about the bill.
Common details include:
- Business or trading name
- Name of the person responsible for billing
- Email address
- Phone number
- Business address
- Country
- Tax or VAT number, when applicable
- Company logo
2. Add Your Customer’s Details
The next step is to enter the information for the person or company you are billing. Depending on the type of transaction, you may need the customer’s name, company name, email address, phone number, and billing address.
Accuracy is especially important here. A simple spelling mistake in a company name or incorrect billing information can cause problems when an invoice reaches a customer’s accounting department.
3. Give the Invoice a Unique Number
Every invoice should have a unique number so that you and your customer can identify it easily later. You can keep the system very simple, such as INV-001, INV-002, and INV-003, or create a format that includes the year or another reference.
For example, you could use 2026-001, 2026-002, and 2026-003. There is no need to make the numbering system complicated. The main goal is to keep it consistent and avoid using the same number for different invoices.
Having a unique number is also useful when you need to check whether an invoice has been paid, follow up with a customer, or locate an old document.
4. Add the Invoice Date and Due Date
The invoice date tells the customer when the invoice was issued, while the due date tells them when payment is expected. Both should be easy to find on the document.
For example, an invoice could show:
Invoice Date: September 3, 2026
Due Date: September 17, 2026
A specific due date is much more useful than simply writing “Please pay soon.” Depending on your agreement with the customer, you may also use payment terms such as due on receipt, Net 7, Net 15, or Net 30.
The payment terms should always match what you have agreed with the customer before the invoice is issued.
5. List the Products or Services
The line-item section explains exactly what the customer is being charged for, so it deserves careful attention. Avoid descriptions that are too vague because the customer should not have to guess what a particular charge means.
For instance, instead of writing “Design work — $800,” provide a clearer breakdown such as “Website homepage design — $400,” “Mobile layout design — $200,” and “Website revisions — $200.”
For hourly services, you can also show the number of hours and the rate. A line such as “10 hours × $50 = $500” gives the customer enough information to understand how the amount was calculated.
Clear line items make an invoice easier to review and can reduce unnecessary questions before payment.
6. Check Quantity and Unit Price
Each line item should have the correct quantity and unit price. When an invoice contains several products or services, showing these details separately makes the final total much easier to verify.
For example:
| Description | Quantity | Unit Price |
|---|---|---|
| Logo design | 1 | $250 |
| Social media banners | 5 | $40 |
| Brand guide | 1 | $150 |
An invoice builder can be especially useful here because it can calculate line totals and the overall amount automatically. That reduces the amount of manual work involved when an invoice contains multiple items.
7. Add Discounts or Additional Charges
If you have agreed to provide a discount or need to include charges such as shipping or handling, show them separately on the invoice rather than hiding them inside the final amount.
For example, the invoice could show a subtotal of $1,000, followed by a $100 early-payment discount, $30 shipping, and the applicable tax before displaying the final amount due.
Clear labels make it easy for the customer to understand why the total differs from the original price. Whenever an amount is added or deducted, the customer should be able to see exactly what it represents.
8. Add Tax When Required
Tax requirements vary depending on your business, location, customer, and the rules that apply to the transaction. When tax is applicable, display the rate and amount clearly so the customer understands how the final total was reached.
For example:
Subtotal: $500
Tax: 10%
Tax Amount: $50
Total: $550
If your business charges VAT, GST, HST, sales tax, or another applicable tax, use the correct terminology for your situation. Do not add tax simply because your invoice template includes a tax field; only include amounts that actually apply to the transaction.
9. Add Payment Instructions
An invoice should make the payment process as easy as possible. Along with the amount due and due date, include clear instructions explaining how the customer can pay.
You may include your bank transfer details, payment link, preferred payment method, account information, or a payment reference that the customer should use.
If you want the customer to include the invoice number with the payment, mention that clearly. The fewer questions the customer has about where and how to pay, the smoother the payment process is likely to be.
10. Add Notes and Terms
The notes section is useful for information that does not belong in the main line-item table. This could be a simple thank-you message, a payment reminder, or another short instruction that the customer should know.
For example, you could write, “Thank you for your business,” or “Please include invoice number INV-1042 with your payment.”
If your business requires more detailed terms and conditions, they can be included where appropriate. Keep this section readable, though. Adding a large amount of unnecessary text can make an otherwise simple invoice harder for the customer to understand.
11. Review the Invoice Before Sending It
Before sending an invoice, take a moment to review every important detail. Even when the invoice was generated automatically, it is still your responsibility to make sure the information is correct.
Check the customer name, business details, invoice number, dates, product or service descriptions, quantities, prices, taxes, discounts, total amount, payment information, and recipient email address. It is also worth checking the spelling and reviewing the final PDF before sending it.
A quick review can prevent mistakes that would otherwise require you to issue a corrected invoice later.
How to Create an Invoice for Free
For a simple invoice, you may not need expensive invoicing software or a complicated accounting system. A free online invoice generator can provide everything you need to prepare a professional document for a customer.
Nexbillio is designed around this straightforward workflow. You can enter your business details, customer information, line items, taxes, discounts, payment terms, and other invoice information, then prepare the finished document for PDF download or sharing.
The tool also provides options for branding, multiple currencies, tax fields, shipping or handling charges, notes, terms, and payment information. This makes it useful when you need to create an invoice quickly without spending time designing one manually.
What Should an Invoice Include?
A professional invoice should contain enough information for the customer to understand the transaction and complete the payment.
At a minimum, an invoice will usually include the following:
- Business or seller information
- Customer information
- Unique invoice number
- Invoice date
- Payment due date
- Product or service descriptions
- Quantity
- Unit price
- Subtotal
- Applicable tax
- Applicable discount
- Total amount due
- Payment instructions
Depending on the type of business and the location of the transaction, additional tax, registration, or legal information may also be required.
Invoice Template vs. Invoice Generator
An invoice template gives you a ready-made layout that you fill in manually. This can be a practical option when you only create invoices occasionally and your billing needs are simple.
An invoice generator takes the process one step further. Instead of manually formatting the document and calculating every figure, you enter information into defined fields and the tool builds the invoice for you.
The better option depends on how frequently you send invoices. Someone who creates only a few invoices each year may be perfectly comfortable with a template, while a freelancer or small business that sends invoices every week may save considerable time by using an online invoice maker.
Common Invoice Mistakes to Avoid
Even an attractive invoice can cause problems when important information is missing or incorrect. One of the most common mistakes is using vague descriptions that do not tell the customer what they are actually paying for.
Forgetting the due date can create another problem because the customer may not know when payment is expected. Manually calculating several line items, taxes, and discounts also increases the possibility of errors.
Using the same invoice number more than once can make record-keeping difficult, while sending the wrong document to a customer can create a much more serious problem.
The design itself also matters. An invoice does not need to be complicated to look professional. Customers should be able to find the total amount, due date, and payment instructions quickly.
How to Make an Invoice Look More Professional
Professional billing does not require an elaborate design. In most cases, a clean and organized layout is more effective than an invoice filled with unnecessary graphics or decorative elements.
Use your business name consistently and add your logo when appropriate. Keep headings clear, make the most important information easy to find, and arrange the document in a logical order.
A simple structure works well:
Business information → Customer information → Invoice details → Line items → Totals → Payment instructions
Most importantly, make the final amount due easy to identify. Your invoice should look trustworthy and organized while keeping the customer’s attention on the information that matters.
How Soon Should You Send an Invoice?
In most situations, it makes sense to send an invoice promptly once the work is complete or the billing milestone has been reached. Waiting too long can make it easier for invoices to be forgotten, both by the business and the customer.
For projects that are divided into milestones, follow the payment schedule you agreed upon with your customer. For recurring work, keeping the billing process consistent can make it easier for customers to know when invoices will arrive.
A simple, predictable invoicing routine can make payment follow-up much easier.
Create Your Next Invoice Online
Creating a good invoice does not require a complicated process. Start with the correct business and customer information, clearly describe what you provided, calculate the total accurately, state when payment is due, and give the customer clear instructions for making the payment.
That is the foundation of a useful invoice.
Nexbillio gives freelancers, contractors, and small businesses a straightforward way to create an invoice online without building the document from scratch. You can add branding, customer information, line items, taxes, discounts, terms, and payment details, then prepare a professional PDF-ready invoice.
When your invoices are clear, accurate, and easy to understand, billing becomes a much simpler part of running your business.
1 thought on “How to Create an Invoice: A Simple Step-by-Step Guide”